
Thursday, 22 May 2014
Birthday Week!
I had a significant birthday on Tuesday, so no real post today as I haven't done much crafting. Too busy eating cake and opening cards! I should be back next week, but in the meantime I leave you with a picture of one of my cakes!

Monday, 19 May 2014
Project Bag
I've been meaning to make a bag to pop into my handbag and contain my knitting for a while now, but I haven't had the 'right' fabric handy. Likewise I've not wanted to buy any because really, I have plenty of fabric I could use.
So, last weekend I had a brainwave moment and taking inspiration from Katy's tutorial, I made my own fabric out of ribbon!
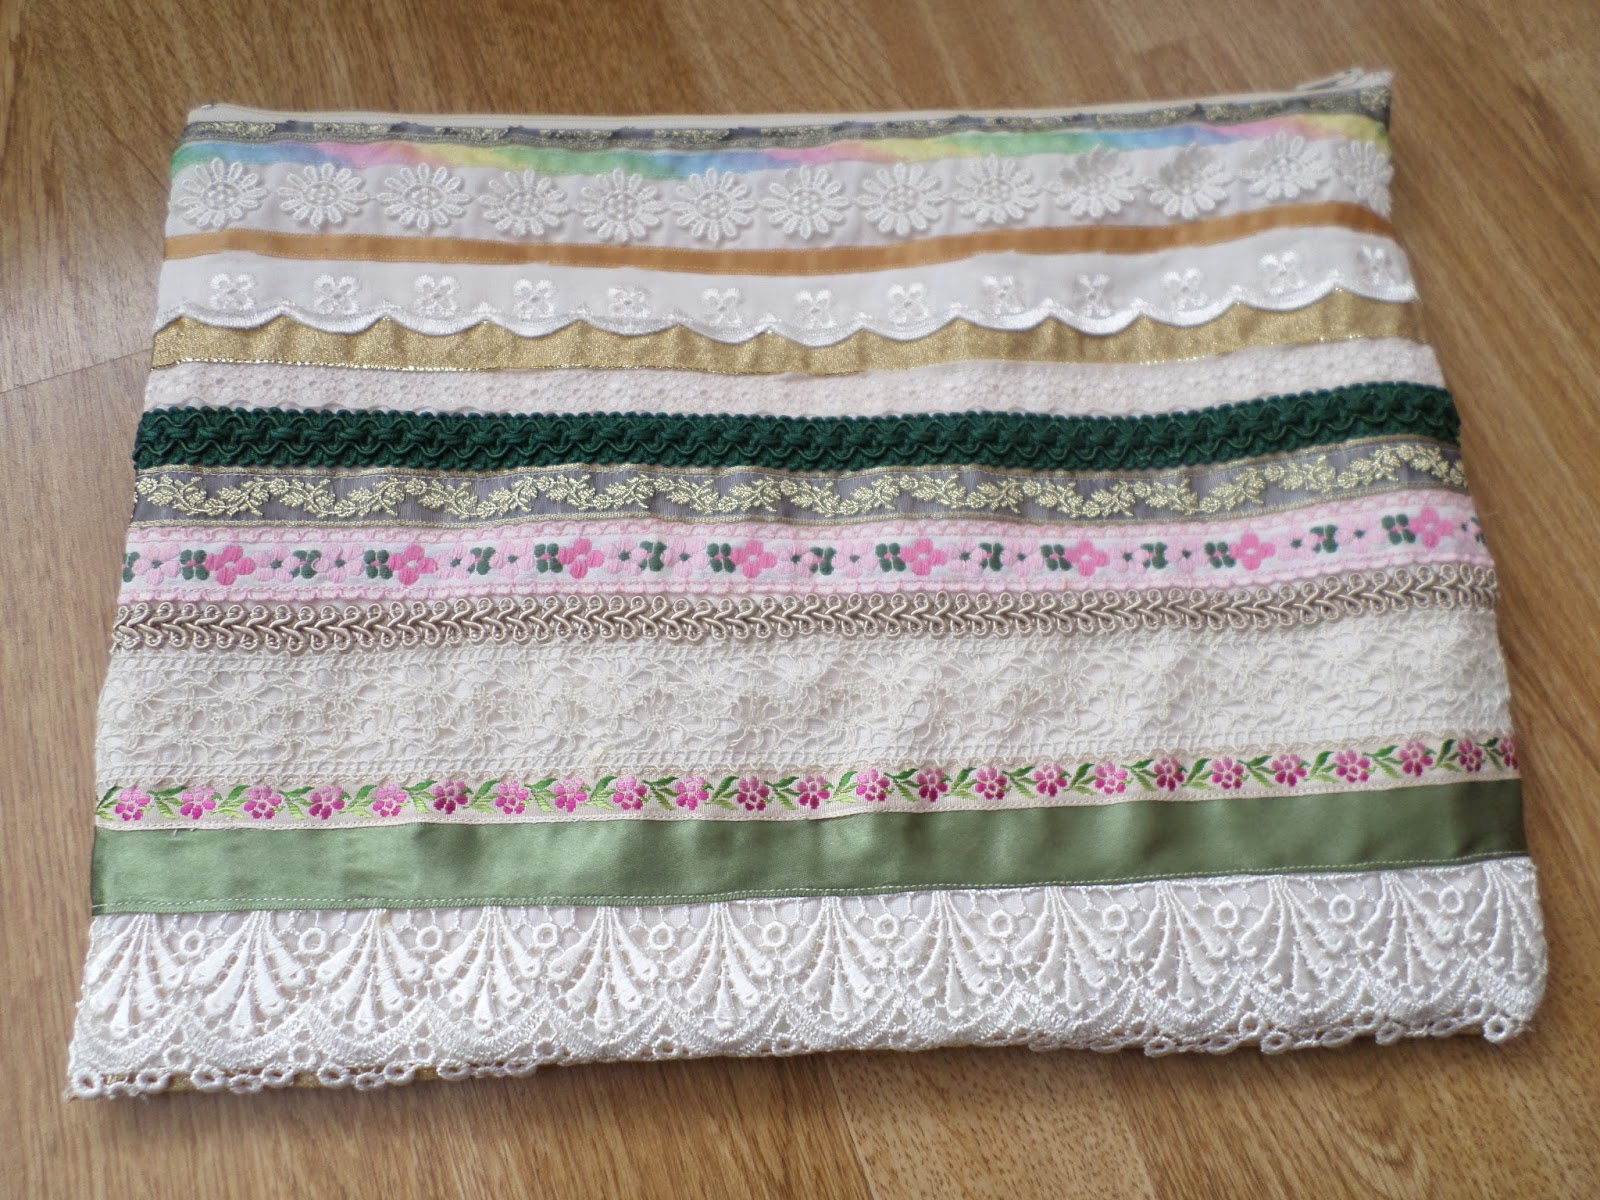
I chose my favourite bits of ribbon and lace in a cream, gold, green and pink theme. I really like how it's turned out!

I cut my base fabric out (a cream cotton I had lining around) and then lined the ribbons up on it until I'd covered it. I debated a plain back but decided I might as well make two panels of ribbons.

I then stitched the ribbons down, one at a time until I was all done. Then I made the bag up same as usual.

I lined it with some cream lining fabric that was the first thing to come to hand and then pressed it to make the bulk of the ribbon behave!

I'm really pleased with it and I think it'll make a lovely addition to my handbag for transporting knitting around!
So, last weekend I had a brainwave moment and taking inspiration from Katy's tutorial, I made my own fabric out of ribbon!
I chose my favourite bits of ribbon and lace in a cream, gold, green and pink theme. I really like how it's turned out!
I cut my base fabric out (a cream cotton I had lining around) and then lined the ribbons up on it until I'd covered it. I debated a plain back but decided I might as well make two panels of ribbons.
I then stitched the ribbons down, one at a time until I was all done. Then I made the bag up same as usual.
I lined it with some cream lining fabric that was the first thing to come to hand and then pressed it to make the bulk of the ribbon behave!
Thursday, 15 May 2014
A Friend for Owl!
I enjoyed making Owl so much that I made him a friend. Rabbit is from the same pattern - Simplicity K1549 and was also made from what I had handy.

He's mostly made of cotton drill, with corduroy and poly cotton. I hand embroidered his face with a simple chain stitch.

Looking at this picture, I think he needs a cotton bob tail. I might make him a pompom one to stitch on at some point!

I am very pleased at how neatly my embroidery turned out!
He's mostly made of cotton drill, with corduroy and poly cotton. I hand embroidered his face with a simple chain stitch.
Looking at this picture, I think he needs a cotton bob tail. I might make him a pompom one to stitch on at some point!
I am very pleased at how neatly my embroidery turned out!
Monday, 12 May 2014
Random Owl!
I felt like making something the other day, and my eye fell on the copies of Sew magazine that are currently at my house. I am really enjoying this magazine and the fact it comes with a free pattern is nice as well!
Anyhow, one of the free patterns is a toy pattern and somehow or another, this little chap came into being...

Isn't he cute?! I thought about taking him to work, for the small people, but I'm not sure I can bear to part with him, so he may end up living here, for Small Bean to play with when she comes round.

He's got a velvet body and wings, linen legs, poly cotton eyes and a satin dupion beak, all scraps dug out of the stash pile.

He was a very quick make (maybe a total of 2 1/2 hours, though I kept getting distracted).

The trickiest part of him was turning him the right way out and even that wasn't hard. The pattern has more animals, so as soon as I get more toy stuffing I foresee his friends being made to join him...
Anyhow, one of the free patterns is a toy pattern and somehow or another, this little chap came into being...
Isn't he cute?! I thought about taking him to work, for the small people, but I'm not sure I can bear to part with him, so he may end up living here, for Small Bean to play with when she comes round.
He's got a velvet body and wings, linen legs, poly cotton eyes and a satin dupion beak, all scraps dug out of the stash pile.
He was a very quick make (maybe a total of 2 1/2 hours, though I kept getting distracted).
The trickiest part of him was turning him the right way out and even that wasn't hard. The pattern has more animals, so as soon as I get more toy stuffing I foresee his friends being made to join him...
Wednesday, 7 May 2014
How We Made A Dress at Craft Night
Monday night is craft night! The reason this differs from every other night of the week is that I have two wonderful friends come round and we craft together, helping each other out when we get stuck.
Just before our first weekend residential larp, one of my friends asked if we could help her run up an under dress, as she was running short of time but needed it for her NPC. We thought it would be fun to document the process, so here's how we did it! Words are by me, photo captions are by Katy! (No really, only Katy would write these captions :-P)
We started off by folding the fabric in half and spreading it out on my lounge floor. (Apologies for the lighting in the photos - they were all taken at night!)
Then, ask your dress wearer to lie down on it with their arms out stretched and draw round them.
Ruth is lying at the point she wanted the dress to end, plus a little extra for hemming purposes. Once you have drawn round your model, cut away any excess fabric at the top.
Then fold in half and giving yourself a generous seam allowance (very generous - we cannot stress the generosity enough), cut allong your drawn lines.
The finished piece will look like the above photo. Ruth wanted slightly droopy sleeves, so that's what we went with, but you can make them as straight or droopy as you want.
This is a good pic of out drawn lines - fun tip - erasable gel pens make great fabric markers because they iron off!
Next - pin the shoulder seams and one side seam and get your model to try their dress on. If you discover, as we did, that you haven't given yourself enough of a seam allowance, don't worry, just cut a strip to be a tiny side panel out of your scrap fabric and pin it in.
Then, try the dress on again and if you are us again, discover that you need to repin your side panels.
Help your model back into the dress...
Then pin any adjustments you need to make and check the overall fit.
Help your model out of the dress (which is ful of pins at this point) and then sew all your seams.
Ypu might also take a break at ths point, like we did!
Once the seams were sewn we neatened them up with the over locker and Ruth tried it on again.
It fitted well so we moved on to pinning the hem.
After that we hemmed the sleeves, neckline and hem and called it a good job well done.
Just before our first weekend residential larp, one of my friends asked if we could help her run up an under dress, as she was running short of time but needed it for her NPC. We thought it would be fun to document the process, so here's how we did it! Words are by me, photo captions are by Katy! (No really, only Katy would write these captions :-P)
We started off by folding the fabric in half and spreading it out on my lounge floor. (Apologies for the lighting in the photos - they were all taken at night!)
 |
| Step 1: ALL OF ZE FABRICS… ALL OF ZEM |
Then, ask your dress wearer to lie down on it with their arms out stretched and draw round them.
 |
| I are drawing a WUTH |
 |
| Ruth: Please amputate my legs here, so that the dress is floor length |
 |
| Shhhhhhh little wuth… go to sweep, when you wake up YOU WILL HAVE NO FEET…AND A DRESS |
Ruth is lying at the point she wanted the dress to end, plus a little extra for hemming purposes. Once you have drawn round your model, cut away any excess fabric at the top.
 |
| Step 50: Let Ruth do the cutting IF YOU ARE LIKE ME AND NOT ALLOWED TO HANDLE SCISSORS. Scissors are for grown-ups. |
 |
| This hole? This is a Ruth. |
 |
| Do not cut off your fingers. ONLY FEET CUTTING IS ALLOWED |
 |
| Step 19: Be sensible like Ruth. :( no-one likes sensible |
The finished piece will look like the above photo. Ruth wanted slightly droopy sleeves, so that's what we went with, but you can make them as straight or droopy as you want.
 |
| USE YOUR MAGIC PENS TO DRAW ON ZE FABRIC. ALSO USE THEM TO DRAW MONKEYS ON EVERYTHING WEEZA OWNS. (Srsly, erasable gel pens – best sewing tool ever. I love them) |
This is a good pic of out drawn lines - fun tip - erasable gel pens make great fabric markers because they iron off!
 |
| Ruth is disappoint. She thinks she will get chilly in this dress, and people will be able to see her knickers… this is because we have not sewn it up yet! |
 |
| Hey look Weeza, I mades a wedding dress!... oh wait… no |
 |
| Step 700: Do not leave thyself enough seam allowance, this allows for you to be CREATIVE. And creative people win. So there! Also, Step 701: Be a skinny minny like Ruth, this way YOU WILL NOT USE SO MUCH FABRICS… and that is ECONOMICAL. |
 |
| Step 968: Take a million photos, make Ruth grumpy. |
 |
| Let’s pretend the angle is ‘artistic’ (bonus points to anyone who gets that reference! Be my friend FOREVER) |
Next - pin the shoulder seams and one side seam and get your model to try their dress on. If you discover, as we did, that you haven't given yourself enough of a seam allowance, don't worry, just cut a strip to be a tiny side panel out of your scrap fabric and pin it in.
 |
| Cut out a strip of some fabric, or let Weeza do it. She’s responsible. |
 |
| Sit and watch Ruth, being Ruth. (THAT IS ME BY THE WAY… MY FACE AND MY EXTREMELY SHORT SKIRT) And you can clearly see in this picture where Ruth’s feet have been amputated from before… |
 |
| Again, notice the RESPONSIBLE ADULT USING THE SCISSORS. This is because if I was allowed to use them RUTH WOULD HAVE NO FEET BY NOW. |
 |
| Step 1034: BE EXTREMELY BORED BECAUSE WEEZA TOOK HER CAMERA AWAY TO TAKE SENSIBLE PHOTOS |
 |
| Ruth: I’m a laaaaaaady |
 |
| Don’t pin Ruth in the boob… she won’t like it. |
Then, try the dress on again and if you are us again, discover that you need to repin your side panels.
 |
| Step 1165: Actually do something helpful for the first time in the evening |
 |
| Step 1166: Realise you weren’t helpful, because you pinned the strip in the wrong place. |
 |
| Step 1167: Twice. |
 |
| PIN AGAIN. This time I was allowed to help with SPEED PINNING. Take a break to let your OCD organise all the pins in Ruth’s pin cushion… or use them to spell out your own name, because this irritates her. |
Help your model back into the dress...
 |
| Here Ruth, HAVE ZIS DRESS |
 |
| Step 1587: BE INSUFFICIENTLY TALL TO HELP RUTH INTO HER DRESS |
 |
| Step 1588: Laugh at the fact that RUTH IS STUCK IN HER DRESS, continue until Weeza puts down the camera to come and help Ruth like the sensible adult she is. |
Then pin any adjustments you need to make and check the overall fit.
 |
| Ruth: Weeeeeza, WHERE YOU STICK ZAT PIN? |
 |
| Droopy droop is too droopy. DROOP |
 |
| Ruth has realised she is wearing A DRESS |
 |
| Ruth: Shut up Katy. You are helping NO-ONE HERE |
Ruth decided she wants the sleeves less droopy, so we pinned them to where she wanted them and cut the excess off.
 |
| TAKE A PITCHER OF ZE WEEZA FACE |
 |
| Weeza: *more pinning of the Ruth-dress* Katy: UGH, ARE WE NOT DONE ALREADY? |
 |
| HALF A DRESS AND RUTH’S AMPUTATED LEGS |
 |
| ARRRRRR… RUTH IS CURRENTLY A PIRATE |
 |
| Even weeza cannot stop the giggles of Ruth being stuck in the dress… oh come on… IT WAS FUNNY |
 |
| But she is adult enough to help through the giggles… the photos are blurry, BECAUSE I AM NOT. |
Ypu might also take a break at ths point, like we did!
 |
| Step 65832: But first… let me take a selfie! |
 |
| Clarification: RUTH IS NOT STRIPPING HERE… I’m not sure what she IS doing, but I’m pretty sure she wasn’t stripping… I think… |
 |
| If you’re interested, THIS IS WHAT WEEZA LOOKS LIKE WHEN SHE WRITES ALL OF HER BLOG POSTS… so now, when you’re reading this, you can picture her, sitting here, WRITING THIS. Except weeza DIDN’T write this. I did. |
Once the seams were sewn we neatened them up with the over locker and Ruth tried it on again.
 |
| LOOK WEEZA – I MADE A RUTH! Or a dress. Or you and ruth made a dress… one of these things. |
It fitted well so we moved on to pinning the hem.
 |
| TWIRL LIKE A BALLERINA RUTH… TWIRL |
 |
| Interesting fact for you… Both Weeza and Ruth pin backwards… MADNESS. I lied about the fact being interesting. |
 |
| AND YOU CAN AGAIN CLEARLY SEE IN THIS PICTURE THAT RUTH HAS NO FEET LEFT… just like she asked at the beginning… I CALL THIS A SUCCESS. |
After that we hemmed the sleeves, neckline and hem and called it a good job well done.
Subscribe to:
Posts (Atom)